
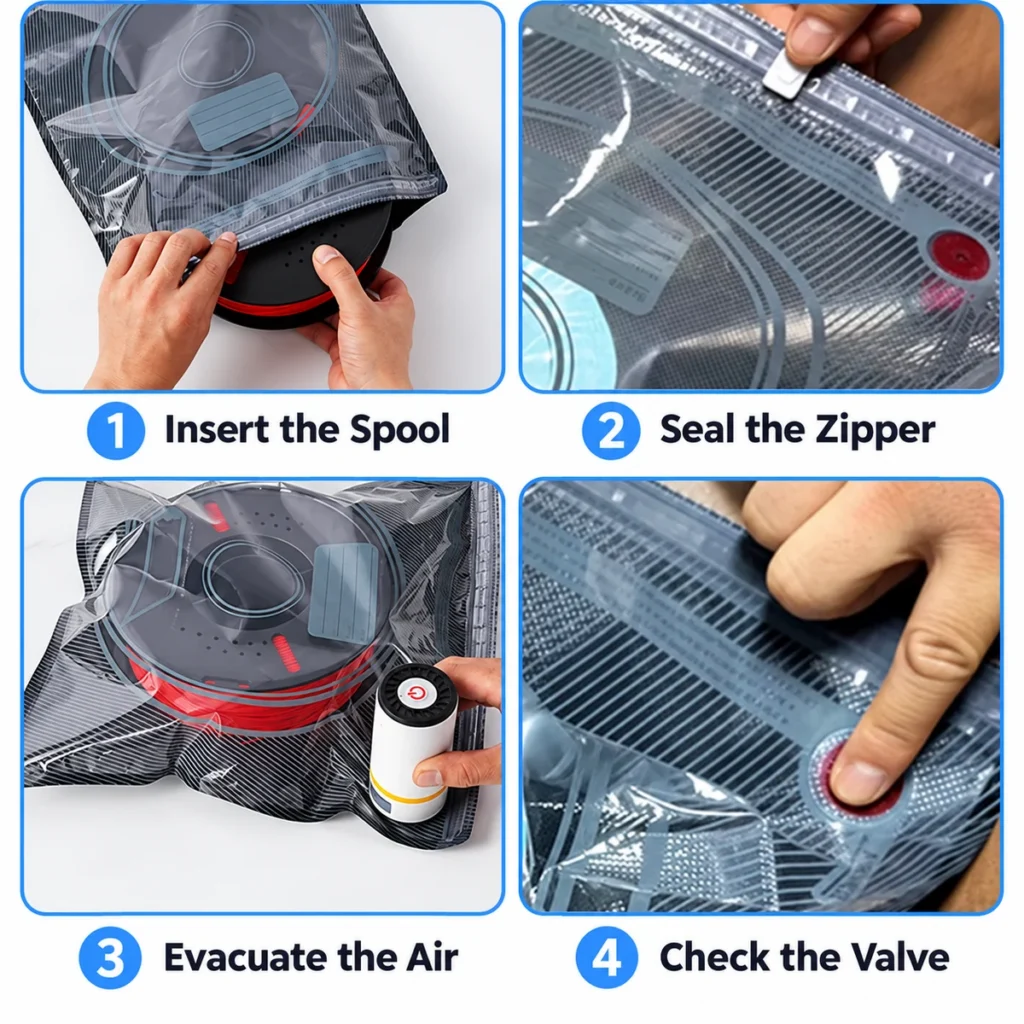
Learning how to vacuum seal 3D printer filament is useful for makers, workshops, distributors, and brands that need a repeatable way to protect dry spools between uses. A vacuum storage bag removes much of the air around a spool and reduces its exposure to humid room air. It does not dry filament that has already absorbed moisture, and it cannot guarantee a fixed storage life. The result depends on the filament condition, bag material, zipper, valve, pump fit, desiccant, handling, and storage environment.
This guide explains a practical sealing workflow for reusable filament bags. It also identifies the checks a buyer should include when evaluating bags or building a retail kit. ClearNest Pack’s current 3D printer filament vacuum storage bag is listed at 34 × 32 cm with a ±1 cm tolerance, PA+PE construction, 0.19 mm total film thickness for both sides combined, a double-track zipper, and an integrated evacuation valve. Actual spool fit and pump compatibility should still be confirmed.
Before You Vacuum Seal a Filament Spool
Start by deciding whether the spool needs drying or storage. Popping at the nozzle, excessive stringing, a rough surface, bubbles in extruded material, or inconsistent printing can indicate moisture, although printing settings and hardware can create similar symptoms. If the material is wet, follow the filament manufacturer’s drying guidance first. Sealing wet filament only traps it in a smaller volume; it does not remove absorbed water from the polymer.
Inspect the spool as well. Sharp flanges, cracked edges, loose filament ends, and protruding labels can puncture or stress a bag. Measure the spool diameter and width rather than relying only on a “1 kg spool” label. If the spool presses against the zipper or valve, choose a more suitable bag instead of forcing the closure.
What You Need
| Item | Purpose | What to Confirm |
|---|---|---|
| Reusable vacuum bag | Creates the storage enclosure | Spool fit, film condition, zipper and valve |
| Dry filament spool | The item being protected | Material, dimensions and initial condition |
| Dry desiccant sachet | Helps manage residual moisture | Condition, suitability and supplier instructions |
| Compatible pump | Removes excess air through the valve | Manual or electric model and valve fit |
| Label or marker | Identifies stored material | Polymer, color, brand and storage date |
ClearNest Pack lists bags-only, compatible manual-pump, and compatible USB electric-pump configurations. A pump is an accessory to the system; its model, electrical details, quantity per kit, and compatibility should be confirmed for the actual order.
Step 1: Dry the Filament When Necessary
Vacuum storage is a maintenance step, not a drying process. If the spool has been exposed to humid air or shows credible moisture symptoms, dry it with equipment and settings appropriate for that polymer and spool. PLA, PETG, TPU, nylon, and filled materials can require different conditions. Excessive heat can deform a plastic spool or damage filament, so use the material supplier’s instructions rather than a universal temperature.
Allow the spool to reach a safe handling condition before packing. Moving a hot spool directly into a bag may introduce temperature-related condensation or stress the film. For a broader comparison of bags, containers, and dry boxes, see the 3D printer filament storage guide.
Step 2: Inspect the Bag, Zipper, and Valve
Lay the empty bag on a clean surface and check both sides under good light. Do not use a bag with punctures, deeply creased corners, damaged heat seals, or a loose valve. Open the zipper fully and remove dust, filament fragments, or desiccant particles. Debris across either zipper track can create a slow leak.
Check that the valve membrane and cap are in their intended positions. Do not peel off a membrane designed to remain attached. If you are comparing closure designs or diagnosing failure points, consult the vacuum bag zipper and sealing guide.
Step 3: Insert the Spool and Desiccant
Place the dry spool into the bag without dragging a sharp flange across the film. Keep the spool clear of the zipper and valve. Add a dry desiccant sachet if it is part of the approved storage method or retail kit, but do not place loose granules where they can contaminate the zipper or valve.
Desiccant helps manage residual humidity and small amounts of moisture entering over time. It cannot compensate for a puncture, open zipper, or saturated filament. Follow the desiccant supplier’s storage, activation, and replacement instructions. For commercial kits, specify sachet count, material, labeling, and packing instead of assuming every bag configuration includes the same accessory.
Step 4: Close Both Zipper Tracks
Flatten the mouth of the bag and align the zipper without wrinkles. Press both tracks together from one end to the other, then run the supplied slider firmly across the entire width. Repeat the motion if necessary and verify the ends by touch. Do not leave filament, a label edge, or excess bag material folded into the closure.
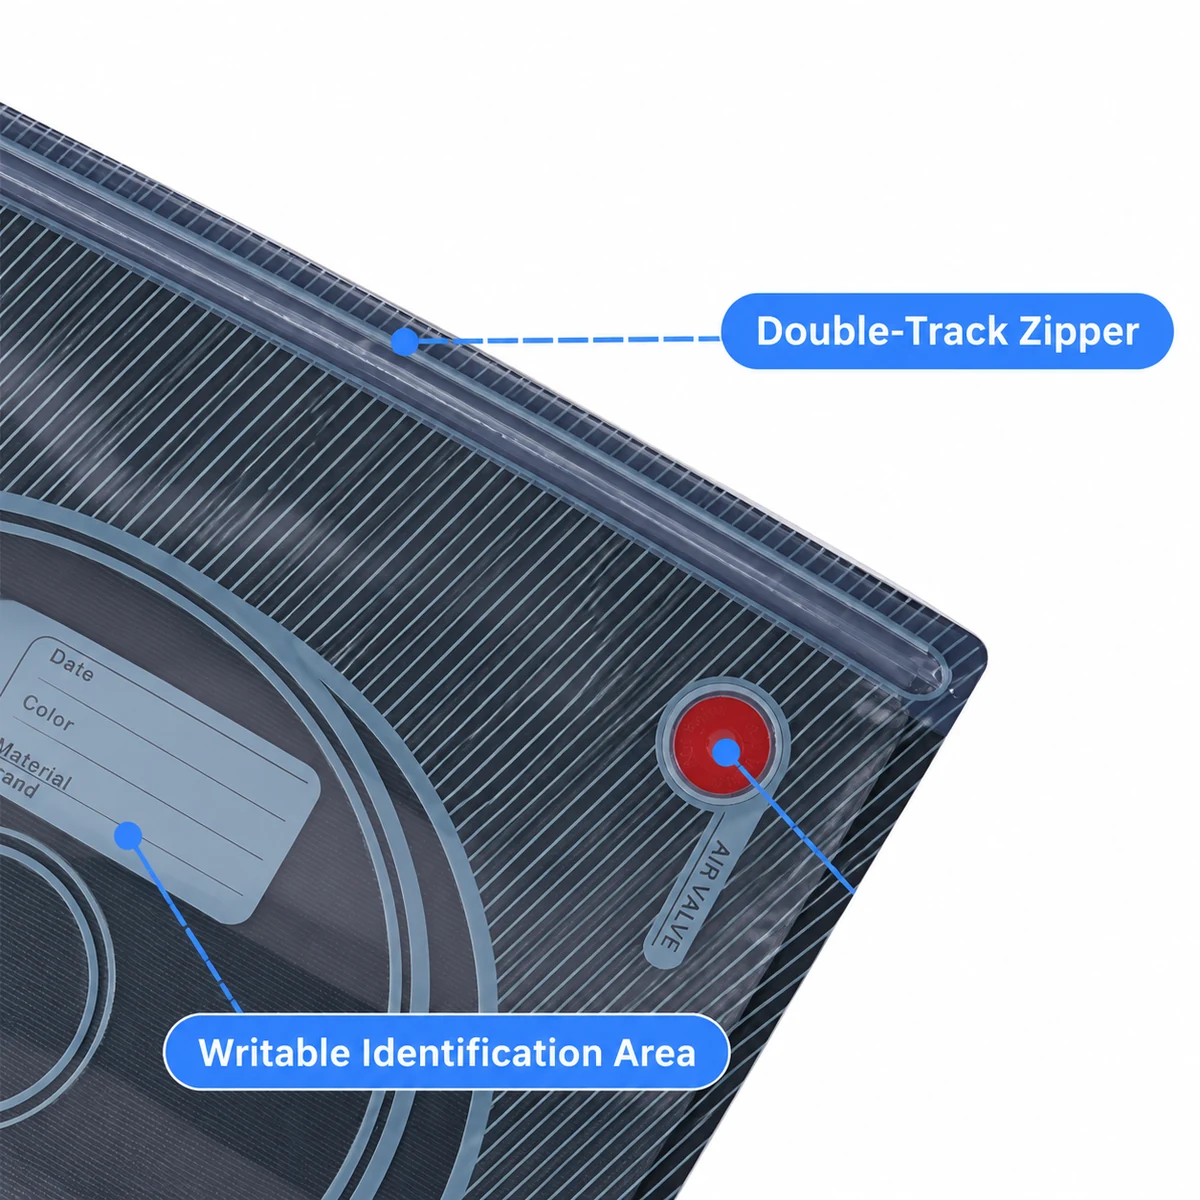
A double-track zipper provides two closure lines, but it works only when both are fully engaged. The most common user error is assuming the slider has sealed the bag without checking the full width. A visual and tactile inspection takes only a few seconds and prevents many apparent valve or film complaints.
Step 5: Attach the Pump Correctly
Place the manual or electric pump squarely over the integrated valve. Keep the bag flat enough for the pump to seat without pulling the valve sideways. Start evacuation and watch the film draw toward the spool. If the pump runs without visible change, stop and check the zipper, valve alignment, and pump connection rather than continuing indefinitely.
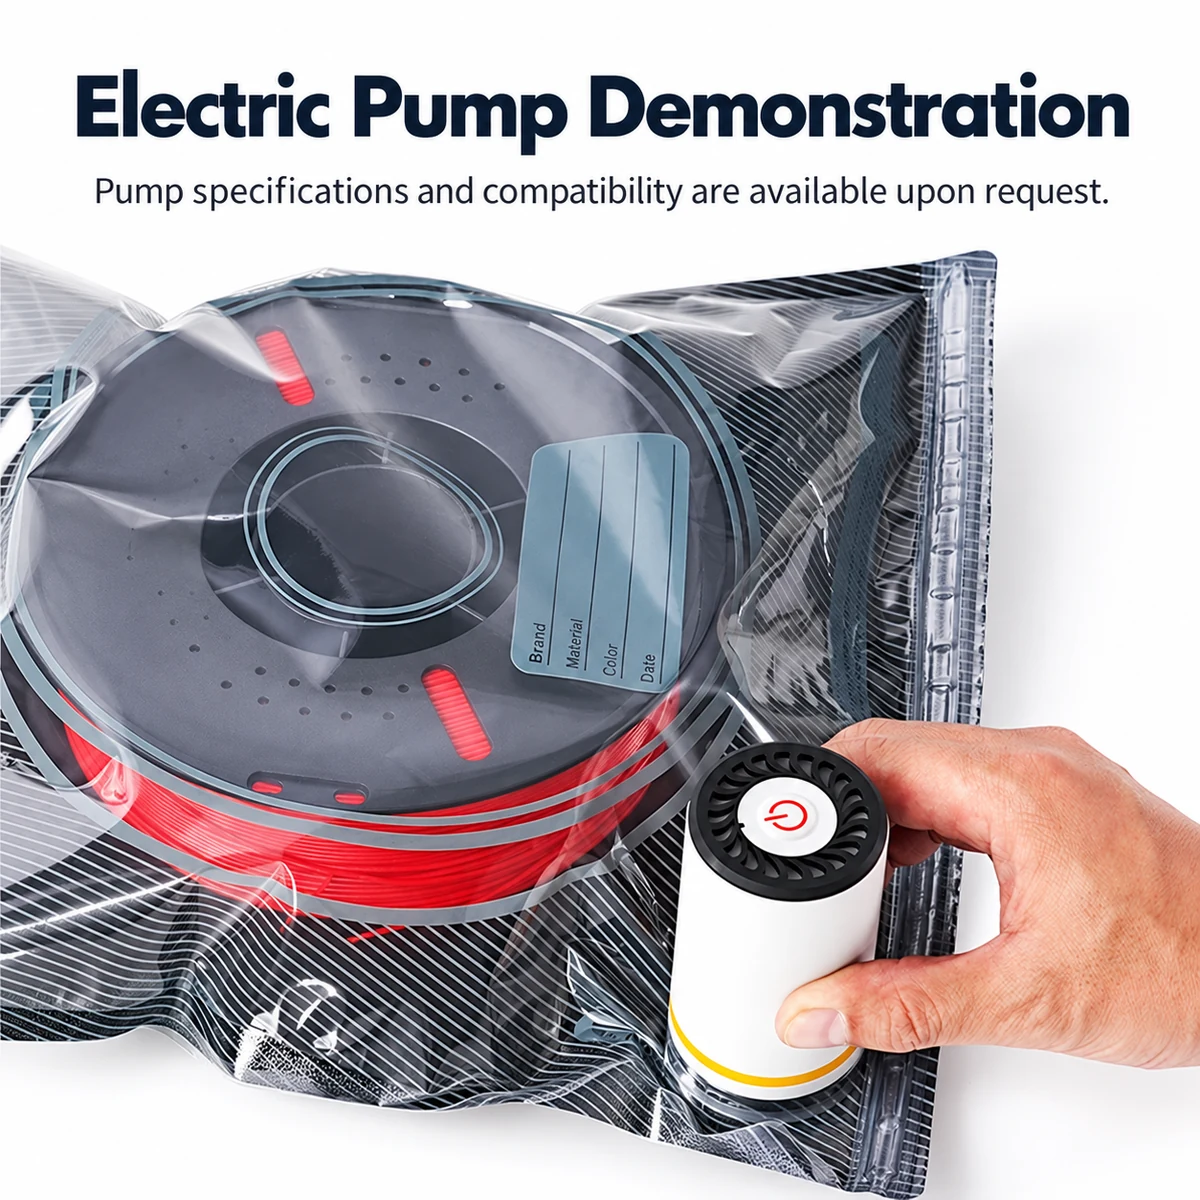
A manual pump is portable and simple, while a USB electric pump can be more convenient for repeated use. Neither type improves the film barrier, and a more powerful pump cannot repair a poor seal. The objective is a repeatable enclosure with excess air removed, not extreme compression that distorts the spool or loads the perimeter seals.
Step 6: Stop at a Practical Vacuum Level
Stop when the bag conforms around the spool and excess air has been removed. Avoid pulling the film tightly across sharp spool edges or creating severe folds at the corners. Excessive evacuation may increase local stress without producing a meaningful improvement in moisture protection.
Remove the pump without disturbing the integrated valve; refit a protective cap only if that component is supplied with the confirmed configuration. Smooth the package gently and inspect the valve bond, zipper ends, heat seals, and corners. The package should look consistently closed, but appearance alone is not proof of a defined barrier performance or storage duration.
Step 7: Label and Store the Package
Record the filament material, color, brand, spool identifier, and packing or drying date. Store the sealed spool away from direct sunlight, heat, sharp tools, chemicals, and areas where the package can be crushed. Do not stack heavy objects on the valve.
Nylon and other moisture-sensitive materials may require tighter controls than occasionally used PLA. Filament needed for long prints in a humid room may be better handled in a controlled dry box during printing. Vacuum bags are useful for storage and transport, but they are one part of the moisture-control workflow.
Step 8: Recheck the Seal
Observe the package after sealing and inspect it periodically. Some relaxation can result from film movement or temperature changes, but obvious reinflation requires investigation. Clean and reseal the zipper once, confirm pump seating, and inspect the valve and film. Persistent vacuum loss suggests a component or handling problem.
Use a systematic vacuum bag leak test to separate zipper, valve, heat-seal, and puncture issues. Do not promise that a bag will remain compressed for a specific number of months unless a documented test under relevant conditions supports that statement.
Instructions for Retail and Private-Label Kits
Distributors and private-label brands should provide instructions that clearly separate drying from storage. Show users how to inspect and close both zipper tracks, position the pump, stop at a practical vacuum level, and protect the bag from punctures. Explain the role of desiccant and state that spool dimensions vary.
Bag-body customization and external packaging customization are different scopes. Changes to bag dimensions, film, zipper, valve, or printing affect the product itself. Labels, instruction cards, barcodes, retail bags, and boxes are packaging work. They can have different minimum quantities, approvals, tooling needs, and schedules. Define both scopes in the quotation and approved sample.
For the currently published standard non-custom bags-only configuration, the product page lists a 1,000-piece MOQ. Custom logo printing on the bag body has a 30,000-piece MOQ. Pump kits, custom dimensions and private-label outer packaging require separate written confirmation. A logo printed on the bag itself is a different production scope from a logo printed on an outer retail bag or box. Buyers preparing a program can also review the wholesale filament vacuum bag buying guide.
Vacuum-Sealing Troubleshooting Table
| Symptom | Likely Check | Practical Response |
|---|---|---|
| Pump runs but air remains | Zipper open or pump not seated | Stop, reseal both tracks, and reposition the pump |
| Bag reinflates quickly | Valve, zipper, puncture, or perimeter seal | Inspect systematically and replace damaged bags |
| Film is stretched at the spool edge | Bag too small or vacuum excessive | Release, check dimensions, and use a better-fitting bag |
| Moisture symptoms remain after storage | Filament was already wet | Dry it correctly before resealing |
| Desiccant indicator changes quickly | Ingress, frequent opening, or spent desiccant | Check the seal and follow desiccant guidance |
Frequently Asked Questions
Can vacuum sealing dry wet 3D printer filament?
No. Vacuum storage helps limit new exposure after filament is dry. Use material-appropriate drying guidance first.
Should I include desiccant in every filament bag?
Dry desiccant is generally useful for residual moisture, but its type and quantity should match the storage plan. It does not replace a reliable seal.
How much air should I remove?
Remove enough for the film to conform around the spool without severe stretching, sharp folds, or distortion. Maximum compression is not the goal.
Can I use any electric pump with the valve?
No. Confirm pump-to-valve compatibility using actual samples. Electrical details and kit configuration also require confirmation.
Why does a sealed filament bag expand again?
Check incomplete zipper closure, debris, pump seating, valve damage, punctures, stressed heat seals, and temperature-related appearance changes.
Is the 34 × 32 cm bag suitable for every 1 kg spool?
Not automatically. Spool diameters and widths vary. Compare actual dimensions and test fit while leaving clearance for the zipper and valve.
Where can buyers compare other bag dimensions?
See the 3D filament vacuum bag size guide for a measurement and sample-approval workflow.
Conclusion
A reliable vacuum-sealing process begins with dry filament, a bag that fits, clean zipper tracks, a sound valve, suitable desiccant, and a compatible pump. Seal carefully, avoid excessive compression, label the package, and recheck it. Commercial buyers should validate the complete system with actual spools and distinguish bag construction from retail packaging requirements. To discuss a bags-only or kit program, request a filament storage bag quotation with spool dimensions, quantity, pump preference, and packaging scope.